State management is an important aspect of frontend development. It’s a topic that can be overwhelming, especially in complex applications, so I decided to write a multi-part series to help me understand how it actually works in React. In this note, I’ll cover the fundamentals, which will be useful for future posts concerning practical state update patterns as well as managing state with reducer and context.
The core feature of React is its reconciliation algorithm that allows you to manipulate the UI in a declarative way. If your UI is in the browser, then instead of telling the browser how to go from the previous state to the next state, you tell React what the next state should be. React then handles everything in between.
The work generally involves:
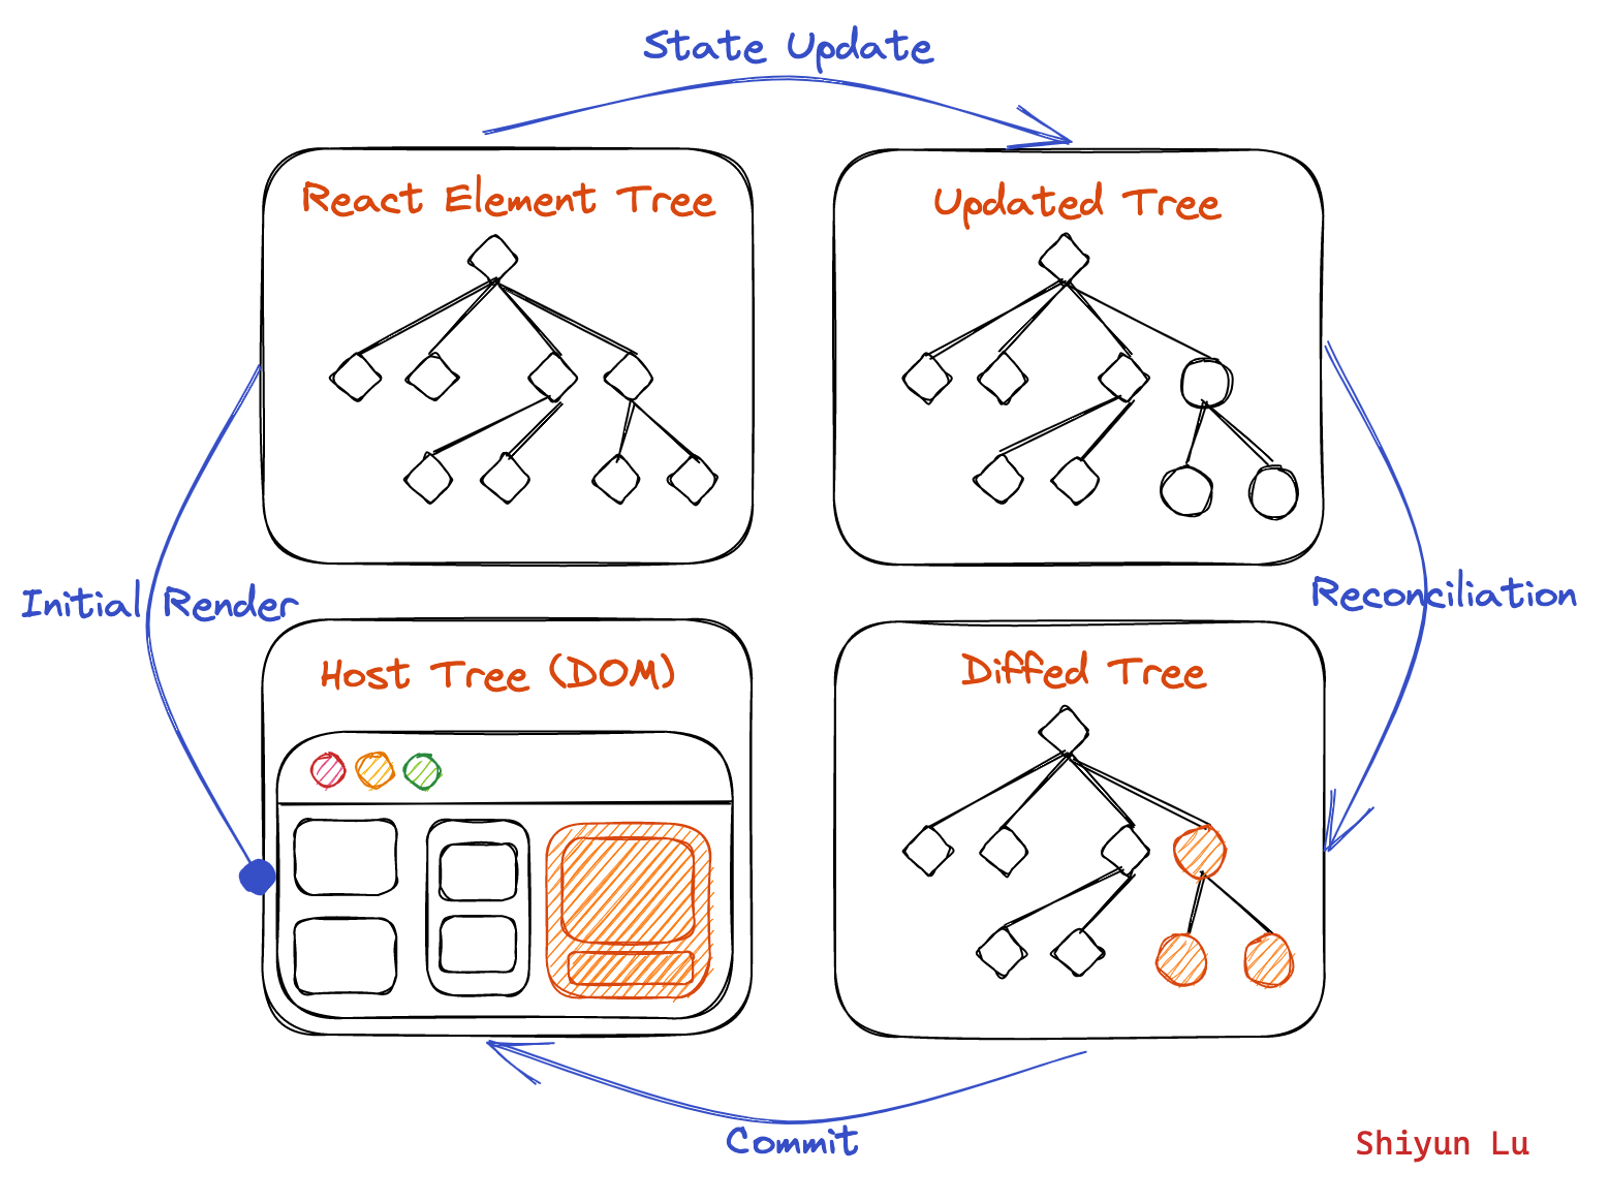
- Generating a new React element tree,
- Diffing it with the previous tree to compute the minimal set of DOM operations, and
- Applying those operations to update the rendered app.
This process is triggered by:
- Initial render
- The component’s and its ancestors’ state updates
Technically, it can be broken down to two phases:
- The render phase, which means React calling your component function, passing in the current props and state.
- The commit phase, which means React modifying the DOM with minimal necessary operations.
I drew the following diagram to illustrate this flow:

Before we get into the render commit flow, I think it’s useful to understand the basic units in React: elements and fibers.
Basic Units
React Elements
A React element is the smallest building block of React apps. It’s a plain JavaScript object that describes either: 1) a host instance (e.g., a DOM node in the DOM environment) or 2) a React component.
DOM Elements
Corresponding to document.createElement, there’s a React.createElement function that creates a React element. It takes arguments type, props, and ...children:
import React from 'react';
import { createRoot } from 'react-dom/client';

// Create a React element
const element = React.createElement(
  'h1', // type
  { className: 'greeting' }, // props
  'Hello World!' // children (text node)
);

// Render the application
const container = document.querySelector('#root');
const root = createRoot(container);
root.render(element);
The createElement function can be rewritten in JSX:
<h1 className="greeting">Hello World!</h1>Both snippets return the same JavaScript object (a React element):
// Slightly simplified
{
  type: 'h1',
  props: {
    className: 'greeting',
    children: 'Hello World!'
  }
  key: null,
  ref: null
}
This object serves as a lightweight description of a piece of the UI at a certain point in time. No host instance is attached to it. Creating it doesn’t lead to a DOM element creation. Additionally, React elements are immutable. Once created, they can’t be changed. This means that they don’t have their own persistant identity. So whenever there’s a change, new elements are created and old ones thrown away.
Component Elements
The type of the element can also be a function or a class corresponding to a React component. In this case, the props object contains the component’s props. For example:
React.createElement(
  Button, // type
  { variant: 'danger' }, // props
  'Delete' // children (text node)
);
The corresponding JSX:
<Button variant="danger">Delete</Button>And they both return:
// Simplified
{
  type: Button,
  props: {
    variant: 'danger',
    children: 'Delete'
  }
}
When React encounters a component element, it asks that component what it renders to, given the current props. For the above example, the Button component might return:
{
  type: 'button',
  props: {
    className: 'btn btn-red',
    children: 'Delete'
  }
}
This process is repeated until all returned elements’ type are DOM tags. In a more realistic exmaple, the final returned value would shape like a tree, hence “React Element Tree” in the diagram above. For example:
{
  type: 'nav',
  props: {
    children: [
      {
        type: 'ul',
        props: {
          children: [
            {
              type: 'li',
              props: {
                children: [
                  {
                    type: 'a',
                    props: {
                      href: '/',
                      children: 'Home'
                    },
                  }
                ]
              },
              key: 'home',
            },
            {
              type: 'li',
              props: {
                children: [
                  {
                    type: 'a',
                    props: {
                      href: '/about',
                      children: 'About',
                    },
                  },
                ]
              },
              key: 'about',
            }
          ]
        }
      }
    ]
  }
}
React Fiber
React Fiber was introduced in React 16 as a re-write of its core reconciliation algorithm to enable features like concurrency and suspense. New hooks like useDeferredValue and useTransition are also built on top of React Fiber. Since it’s been formally introduced, documentations have increasingly referred to it as just “React”. To avoid confusions though, I’ll stick to “fiber” when discussing a specific type of JavaScript object that’s used by React as part of the reconciliation process.
Here’s the data structure of a React fiber from React’s source code, simplified for our topic about state management:
export type Fiber = {
  ...
  // Unique identifier of this child.
  key: null | string,

  // The value of element.type which is used to preserve the identity during reconciliation of this child.
  elementType: any,

  // The resolved function/class associated with this fiber.
  type: any,

  // The references to class instances of components, DOM nodes, or other React element types associated with the fiber node. Generally, this attribute is used to save the local state related to the fiber.
  stateNode: any,

  // The Fiber to return to after finishing processing this one. Conceptually the same as the return address of a stack frame.
  return: Fiber | null,

  // Singly Linked List Tree Structure.
  child: Fiber | null,
  sibling: Fiber | null,
  index: number,

  ...

  // A queue of state updates and callbacks.
  updateQueue: mixed,

  // The state used to create the output
  memoizedState: any,

  // Dependencies (contexts, events) for this fiber, if it has any
  dependencies: Dependencies | null,
  ...
};
Fibers store work order
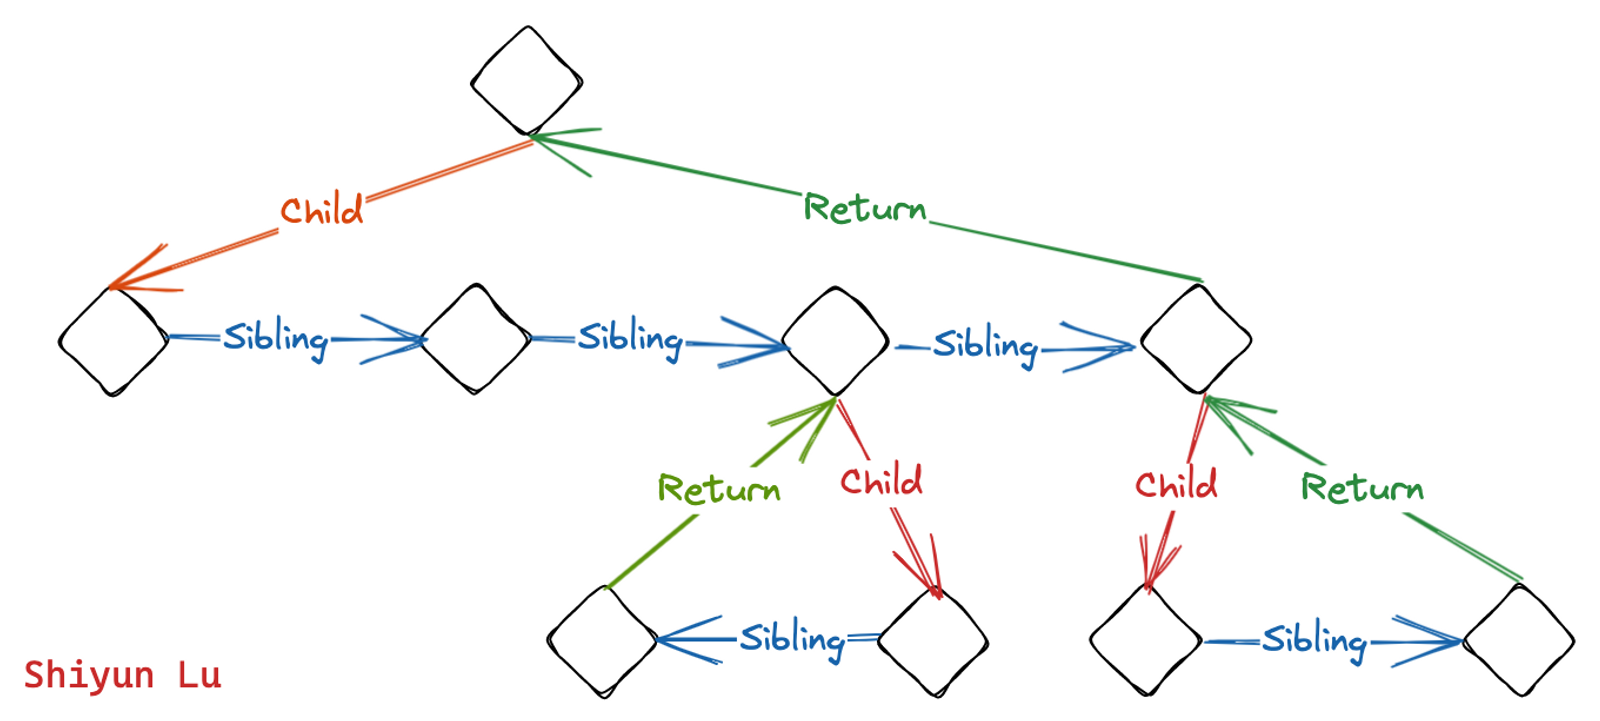
If React Elements are a snapshot of a piece of the UI at a certain point in time, then React fibers are a unit of work that React uses to update the UI. In order to perform the work, fibers form a sinly linked list that represents the order in which the reconciliation work is done. The sinly linked relationship is established via sibling, child, and index properties in fiber objects. The return key is used to return to the parent fiber once work in the child fiber is completed. For the diagram at the beginning of this post, the fiber tree would look like:

Fibers also hold additional info about components
More relevant to our topic, React Fiber holds states, props and other information about a component, and associate the information with the correct component by where that component sits in the React element tree. As part of the information, state is therefore retained between re-renders and state updates will trigger React to render the components with new data.
For a simple example, let’s say we have a counter app that increments whenever user clicks the button:
function App() {
  const [count, setCount] = useState(0);

  return (
    <div className="App">
      <p>You clicked {count} times</p>
      <button onClick={() => setCount(count + 1)}>Click me</button>
    </div>
  );
}
It would have a corresponding React element that resolves to:
{
  type: 'div',
  props: {
    className: 'App',
    children: [
      {
        type: 'p',
        props: {
          children: [
            'You clicked ',
            0,
            ' times'
          ]
        }
      },
      {
        type: 'button',
        props: {
          onClick: () => setCount(count + 1),
          children: 'Click me'
        }
      }
    ]
  }
}
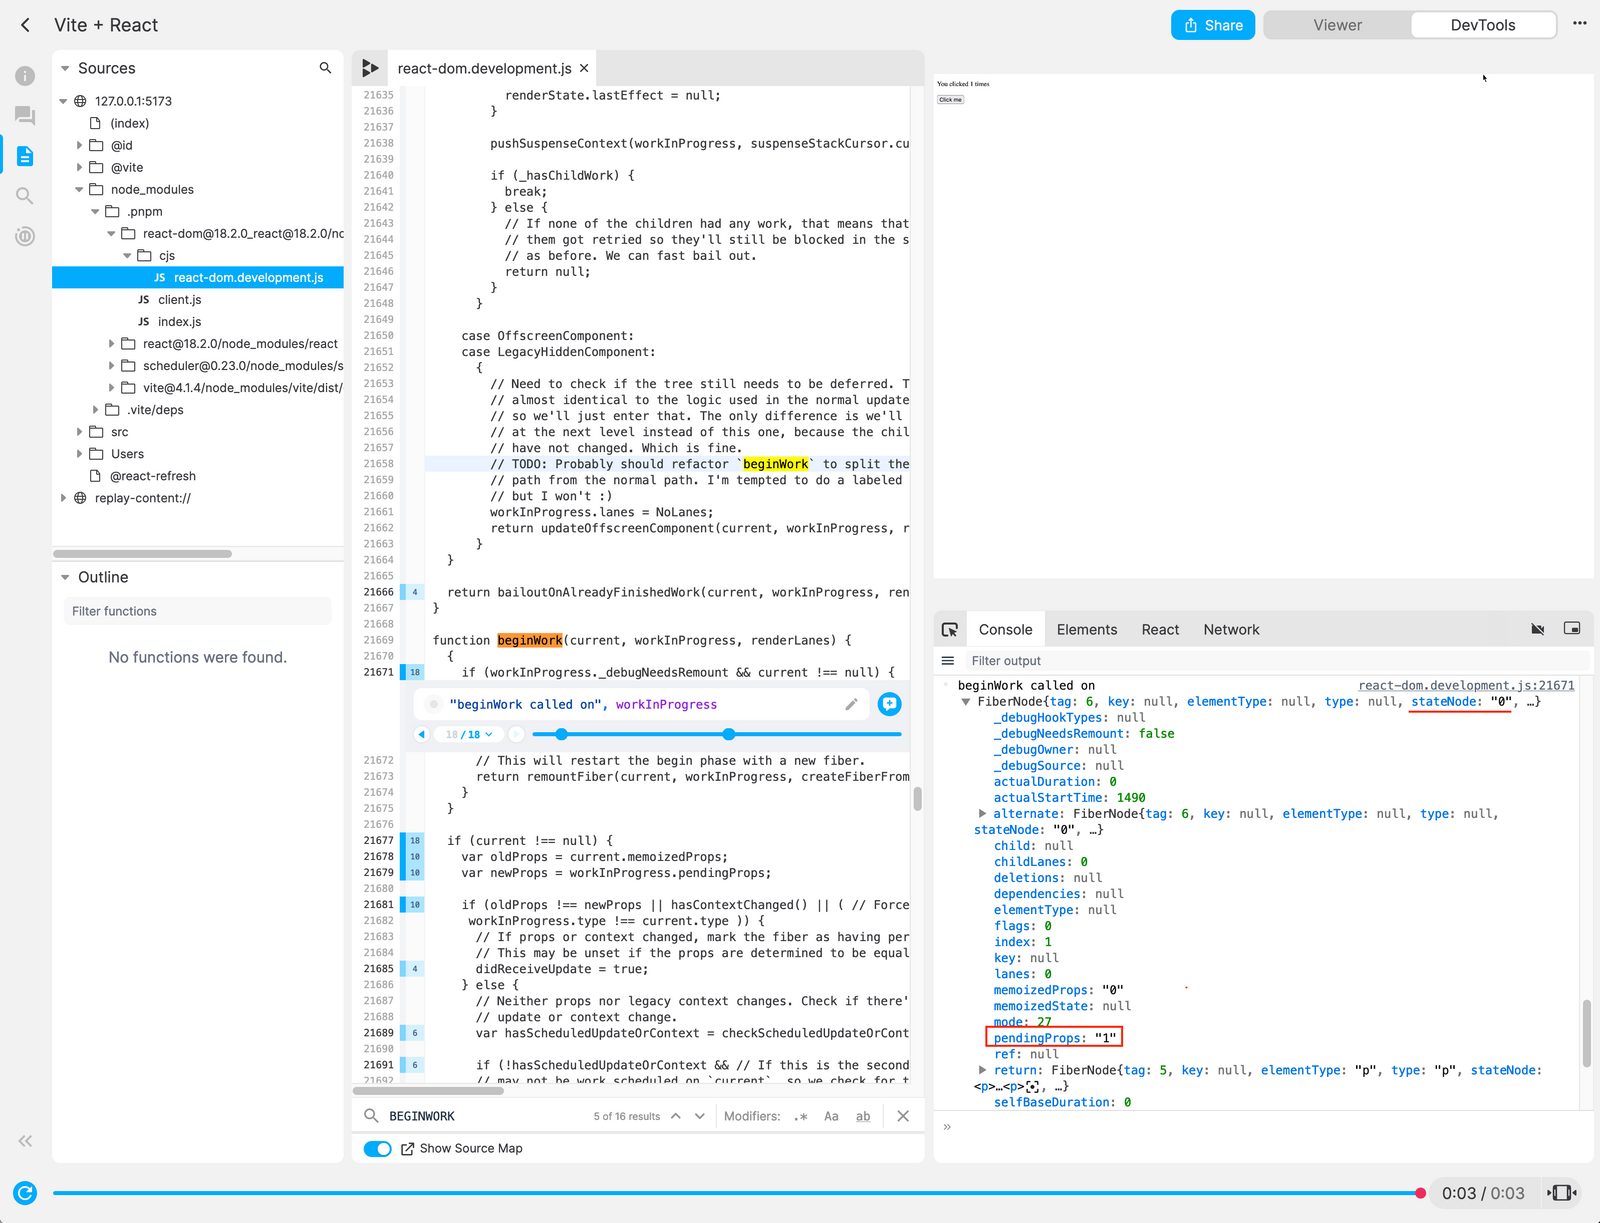
As for fibers associated with the component, Replay comes in handy to print out variables in the source code in node_modules and help us inspect the data structure of React fibers. If you open my demo recording in a Replay browser, you can check out the fiber nodes after one click on the counter button:

There are 8 fiber nodes:
- The root fiber node, which has a
stateNodetype ofFiberRootNodeand a tag ofHostRoot. - The fiber node for the
Appcomponent, which has a tag ofFunctionComponentand anelementTypeofApp(). Additionally, if you investigate thememoizedStateproperty of this node, you’ll see the following:
// Simplified for brevity
{
  ...
  queue: {
    dispatch: dispatchSetState(),
    lastRenderedReducer: basicStateReducer(state, action),
    lastRenderedState: 0,
    pending: {
      ...
    }
    ...
  }
  ...
}- The fiber node for the
divelement, which has a tag ofHostComponentand anelementTypeofdiv. In thememoizedPropsandpendingPropsproperties, you’ll see that their children are similar to the React element we saw earlier. - The fiber node for the
pelement. - The fiber node for “You clicked ” text.
- The fiber node for
{ count }text, which has astateNodeand amemoizedPropsof0andpendingPropsof1. This is because thecountstate is updated from0to1after one click on the counter button. - The fiber node for ” times” text.
- The fiber node for the
buttonelement.
Looking at the logs of React’s source code in Replay helps me better understand how React queues up and executes work, provides updated inputs to components for the next render, and retains state between renders at a conceptual level. So give it a try!
Rendering Phase
“Rendering” means that React is calling your component, which is a function that returns JSX that describes a piece of UI at a certain point in time. The component function’s props, local variables, and event handlers are all calculated using its state at the time of the render.
While regular variables in your component disappear after it returns, React keeps the state in memory outside of the component function. When React calls your component, it provides a snapshot of the state for that particular render. This is just like what we saw in the above example in Replay where a pendingProps of 1 was passed to the component as the count state updated from 0 to 1.
After React calls your component, it uses a heuristic algorithm to compare the returned element tree with the previous render’s element tree to determine what has changed and how to efficiently update the UI. The efficiency relies on two assumptions:
- Two elements of different types will produce different trees.
- The developer can hint at which child elements may be stable across different renders with a key prop.
Let’s take a look in detail at the state update processes and implications of the assumptions above.
State Updates
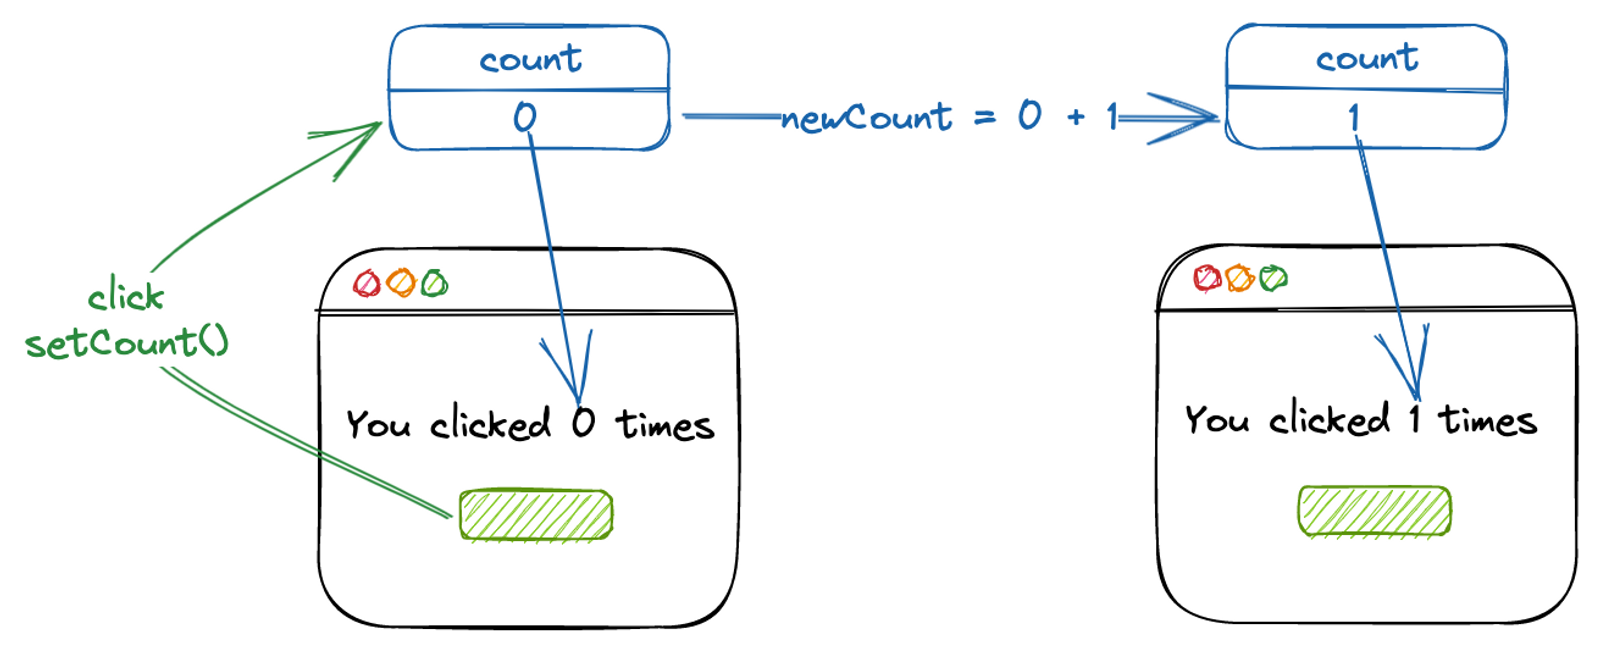
The most common way to trigger a render is to update state. In the previous example, we have a setCount function that updates the count state. When the function is called, it’s like we’re telling React: hey here’s a new count, please call my component again with the new value, and figure out how to make the DOM look like the JSX that’s returned from calling my component.

There’re two ways to use the setCount function to update the count state:
// 1. Pass a value
setCount(count + 1);

// 2. Pass an updater function
setCount((c) => c + 1);
By replacing value
The first way is like a replacer, which asks React to directly replace the current state with a new value. I keep the mental image of having states that forever stay the same in the same render, living outside of a component. This helps me understand behaviors like:
// count is used multiple times in the same render
handleClick = () => {
  setCount(count + 1);
  setCount(count + 1);
};

// translate to (pseudo code)
let newCount = 0 + 1;
let newCount = 0 + 1;

// gives updated count for the next render
let newCount = 1;


// or asynchronous functions in event handlers
handleClick = () => {
  setCount(count + 1);
  setCount(count + 1);
  setTimeout(() => {
    alert(count);
  }, 1000);
};

// translate to (pseudo code)
let newCount = 0 + 1;
let newCount = 0 + 1;
setTimeout(() => {
  alert(0);
}, 1000);

// alert shows the count state in the current render although it's being updated in the same event handler to prepare for the next render
By updater function
For the second way, we’re actually asking React to queue up functions that will be called later. The function is called by React with the previous state as an argument, and the return value of the function is used as the new state. So it leads to different behaviors than the replacer:
// state updater function is used multiple times in the same render
handleClick = () => {
  setCount((c) => c + 1);
  setCount((c) => c + 1);
};

// translate to (pseudo code)
let c = 0;
let c = c + 1 -> 0 + 1;
let c = c + 1 -> 1 + 1;

// gives updated count for the next render
let c = 2;
Reconciliation Assumptions
In the previous section, I mentioned that React Fiber holds states for a component and associate them with the correct component by where that component sits in the React element tree. This has several implications:
- Components that return the same JSX but are in different positions in the React element tree are different components and they each have their own state.
- React Fiber can’t reuse the state of a component if it’s moved in the React element tree.
- State is preserved for the same component at the same position in the React element tree.
All this is tied to how React makes assumptions when checking whether a component is the same as the previous render. Dan Abramov has an excellent piece explaining these assumptions. I’ll summarize and add some examples here.
Two elements of different types are different
This assumption ensures that when React sees a different type at the same position, it knows that it’s a different component without comparing specific attributes. React will then tear down the old tree and build the new tree from scratch. Any state associated with the old tree is lost.
For example:
// let domNode = document.createElement('button');
// domNode.className = 'blue';
// domContainer.appendChild(domNode);
createRoot(document.querySelector('#root')).render(
  React.createElement(
    'button',
    { className: 'blue' },
  ),
);

// Can reuse host instance? No! (button → p)
// domContainer.removeChild(domNode);
// domNode = document.createElement('p');
// domNode.textContent = 'Hello';
// domContainer.appendChild(domNode);
createRoot(document.querySelector('#root')).render(
  React.createElement(
    'p',
    {},
    'Hello',
  ),
);
On the flip side, if the type is the same, React will reuse the existing instance. This is why we can update the className attribute of the button without losing the state:
// let domNode = document.createElement('button');
// domNode.className = 'blue';
// domContainer.appendChild(domNode);
createRoot(document.querySelector('#root')).render(
  React.createElement(
    'button',
    { className: 'blue' },
  ),
);

// Can reuse host instance? Yes! (button → button)
// domNode.className = 'red';
createRoot(document.querySelector('#root')).render(
  React.createElement(
    'button',
    { className: 'red' },
  ),
);
So say that we have a state of count associated with a component that renders the button. When count is greater than 5, the blue button becomes red:
const App = () => {
  const [count, setCount] = useState(0);

  return (
    <button
      className={count > 5 ? 'blue' : 'red'}
      onClick={() => setCount(count++)}
    >
      {count}
    </button>
  );
};
As shown in the previous code snippet, the button element is reused because it has the same type and same element tree position. This means that React won’t discard old state and create a new count of 0 when the button’s class changes from ‘blue’ to ‘red’, which would result in a bug.
Again, another example with props, which is a dialogue that renders a message depending on its props before an input:
const Form = ({showMessage}) => {
  let message = null;
  if (showMessage) {
    message = <p>Message</p>;
  }

  return (
    <dialogue>
      {message}
      <input />
    </dialogue>
  );
};
The input element in this example would be reused if showMessage changes from false to true. This is because regardless of whether showMessage is true or false, it’s the second child and doesn’t change its tree position between renders.
If
showMessagechanges from false to true, React would walk the element tree, comparing it with the previous version:
- dialog → dialog: Can reuse the host instance? Yes — the type matches.
null→ p: Need to insert a new p host instance.- input → input: Can reuse the host instance? Yes — the type matches.
Keys give elements explicit identity
The process for lists is a bit more complicated. Say we have a dynamic list of items that changed its ordering but each item stayed the same. When React sees the list, it recognizes that the element type for each item is the same, so it resuses the host instance. However, the content for the item at each position changes, so React would go through the list one by one to update the content of each item. This is unnecessary.
Additionally, this may lead to bugs. As mentioned before, state is associated with a component based on its position on the React element tree. In the context of a list of items that have the same element type, when item a is moved from position 1 and item b is moved to position 1, React doesn’t think the state assotiated with position 1 needs to change because it’s still the same component from React’s perspective. So React would provide state meant for item a to item b.
Instead, React relies on list items’ key property for reconciliation. A key tells React that it should consider an item to be conceptually the same even if it has different positions inside its parent element between renders. For example, when React sees <li key="3"> inside a <ul>, it will check if the previous render also contained <li key="3"> inside the same <ul>. React will reuse the previous host instance with the same key if it exists, and re-order the siblings accordingly along with their associated states.
Commit Phase
The commit phase is the last phase of the render cycle. After React calls your component, it generates a list of effects that need to be applied to the DOM tree and continuously executes them until they’re completed without any pause. The main point for this phase is that the effect list generated in the previous phase is a minimal set of necessary changes because updating the actual DOM is way more expensive than all the operations we discussed before that happen in the “virtual DOM”. React will not touch the parts of the DOM that don’t need to be updated.