In the past few years, we’ve seen huge improvements in frontend tooling. Some of the most notable shifts include:
- First class support for JavaScript Modules, thanks to modern browsers’ native support.
- Core JS tools written or re-written in compile-to-native languages, such as Turbopack (Rust), swc (Rust), esbuild (Go).
- The rise of opinionated toolchains that collapse the layers of tooling while providing plugin API for extensibility, such as Vite and Turbopack.
With the accelerated change, I’ve quickly become comfortable with highly abstracted pipelines provided by tools like Vite and meta-frameworks like Next.js. While it allowed me to spend most of my time actually coding, I didn’t have a deep understanding of how they work. If you also find yourself in a similar situation, I think it’s worthwhile to explore the fundamentals of a typical toolchain and how its components fit together. It’s useful to know what’s going on under the hood in case you need to make customized tweaks or debug issues.
A modern frontend toolchain typically consists of the following categories, including some examples of popular tools for each specific category:
- Development: tools that help you write stable and reliable code
- Transformation: tools that transform your code to be understood by most browsers
- Compilers: Babel, swc, TypeScript
- Post-development: tools that ensure your code continues to run on the web
Package Managers
Package managers help you install, update, and manage third-party dependencies. A dependency can be an entire JS library, such as React, a small utility library, such as date-fns, or a command line tool, such as ESLint.
Theoretically, you could use third-party packages without a package manager. However, as you scale, especially in today’s frontend scope, you’ll quickly realize that the list of tasks you’d have to handle would be pretty overwhelming, if not impossible:
- Finding all the correct package JS files.
- Checking them to make sure they don’t have any known vulnerabilities.
- Downloading them and putting them in the correct locations in your project.
- Writing the code to include the package(s) in your application using JS modules.
- Doing the same thing for all of the packages’ sub-dependencies, which could be tens or hundreds.
- Removing all the files and code where you import them if you want to remove the packages.
- Repeating the process all over again when you upgrade dependency versions.
- Complicated manual process to handle duplicate sub-dependencies among your dependencies.
Most importantly, client-side JS probably isn’t the only type of packages you want to include in your projects locally. You might also want to include command line tools and configure them specifically for the project. Without a package manager, it’s near impossible to ensure their consistency across contributors. All in all, package managers are usually the first tool you’ll need to install.
The most popular package managers are npm (built into Node.js), Yarn Classic and Yarn Modern, and pnpm. In terms of functionalities, they have virtually reached parity, apart from some advanced features. In addition to managing dependencies, they all can be used to: 1) handle and write metadata about your project, 2) run scripts, 3) publish your project to a registry, and 4) perform security audits.
However, they differ in architectural design and processes, which result in performance variations. The major difference is in their dependency resolution strategies. Dependency resolution is the process of finding the correct version of a package to install, which is usually a combination of the package’s version range and the version ranges of its sub-dependencies.
The Hoisted Approach
Both npm (since v3) and early Yarn Classic use the “hoisted” approach, which means that they use some kind of hoisting scheme to flatten the dependency tree so that some sub-dependencies are installed in a flat way, in the same node_modules as the primary dependency that requires them. Npm’s official documentation has a nice visual to compare the hoisted approach (v3, flatten dependencies) with the earlier approach of nested dependencies (v2):
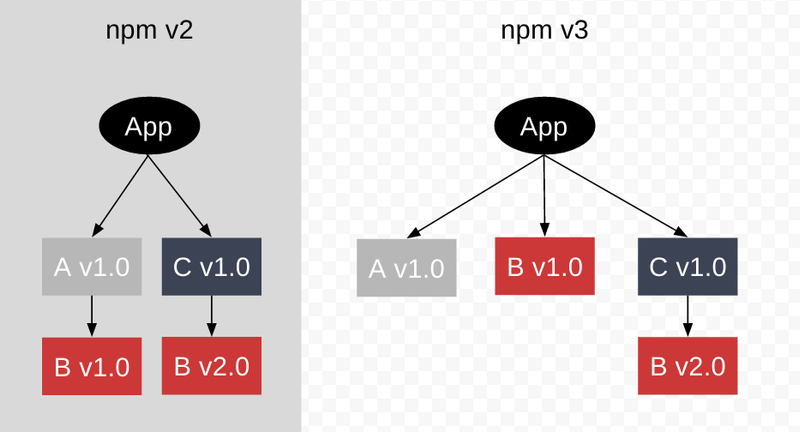
There are several downsides to this approach:
- Phantom dependencies: when a project uses a package that’s not defined in its
package.jsonfile. This can happen because the used packages are secondary dependencies that are saved in the root ofnode_modulesand are therefore available to be imported without any consideration ofpackage.json. It can lead to incompatible versions of or missing packages being used in your code. - Npm doppelgangers: when multiple copies of the same version of the same package are installed. This usually happens with large-scale projects that have complicated dependency trees. It can cause large disk usage and bloated bundle size.
- Costly flattening operations: the package manager has to go through all primary and secondary dependencies to build a full dependency tree and flatten it as much as possible. This can cause slow installation times.
The Symbolic + Hard Link Approach
This approach was introduced by pnpm in 2017 to solve npm’s and Yarn Classic’s problem of saving redundant packages. For example, with npm and Yarn Classic, if you have 100 projects using the same dependency, you’ll have 100 copies of that dependency saved on disk. With pnpm, all dependencies are saved only once in a single content-addressable store on disk, and their files are hard-linked to the projects that use them. Packages are listed in node_modules in a non-flat way (nested) and pull secondary dependencies through symbolic links. Again, a nice visual from the official docs:
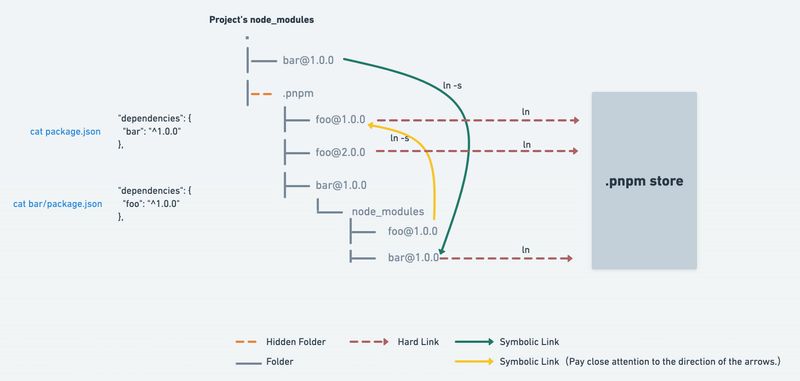
This approach is advantageous compared to the previous one in several ways:
- Saves disk space: only one package and version is saved on disk even if it’s used across different projects.
- Faster installation: only install new packages and new files for different versions during pnpm install and update.
- Nested dependencies: no need to flatten the dependency tree with a costly algorithm.
Plug’n’Play
In 2018, Yarn introduced a new approach called Plug’n’Play and is used by default by Yarn Modern. It got rid of the node_modules folder entirely in favor of the .pnp.cjs file, which maps all packages installed in your project to their locations on disk, bypassing Node. This is possible because Yarn knows everything about your dependency tree, including the relationships between packages and their exact locations on disk.
This approach eliminates the need to generate node_modules, which, according to Yarn, can take 70% of the time during a Yarn install. In addition, every package is stored and accessed directly inside the Zip archives from the cache, which takes up less space than node_modules. However, the JS ecosystem is still catching on with PnP and it’s likely you’ll run into packages not compatible with it.
Linters and Formatters
Linters are tools that programmatically check your code for common errors, inefficiencies, and stylistic inconsistencies. ESLint is the industry standard for linting JavaScript, including TypeScript. It offers plugins for text editors and can be configured to watch your code as you write it. It’s also highly configurable, so you can set it up to match your preferred rule set. Many companies and projects have shared their ESLint configurations. Popular ones include Airbnb and Standard.
Personally, I enjoy using ESLint with different popular configurations for the learning experience. Getting ESLint warnings for a violation almost always intrigues me to go down the rabbit hole to find out why a certain rule is considered “best practice”. For example, when I used a for...in loop, Airbnb’s style guide yelled at me: ”for...in loops iterate over the entire prototype chain, which is virtually never what you want. Use Object.keys, Object.values, Object.entries, and iterate over the resulting array”. This helped me learn more about JavaScript objects, especially the enumerability and ownership of their properties.
Code formatters somewhat relates to and overlaps with linters. While linters are more focused on the correctness of your code, formatters are solely concerned with your code style. Prettier is a very popular example of a code formatter. Like ESLint, it has plugins for text editors and can format your code on save. It’s an opinionated tool and only exposes a few configuration options. This is intentional because the goal is to help developers avoid bike shedding over style and focus on the substance of their code. Use Prettier to save yourself from arguments.
Bundlers
Why Bundle?
Almost all frontend developers are familiar with the concept of bundling because, even after the browsers’ native support for JS modules in 2018, it’s still arguably the only way to write modern JS while having it run reliably in production. At the very basic level, bundling is a process of concatenating your source code into a single file. Imagine you have this index.html:
<html>
...
    <script src="/src/foo.js"></script>
    <script src="/src/bar.js"></script>
    <script src="/src/baz.js"></script>
  </body>
</html>
First, manually organizing your code and dependencies this way is labor-intensive and error-prone. Secondly, each file requires a separate HTTP request, so your app can only start after 3 round trips to the server. It’s better to have a bundler combine all 3 into a single, correctly ordered file:
<html>
...
    <script src="/dist/bundle.js"></script>
  </body>
</html>At a more detailed level, bundlers crawl, process, and concatenate code with the following processes in mind:
- Resolving dependencies so the final bundle loads modules in dependency order.
- Optimizing code for production so that your JS file is as small as possible before it’s uploaded to a sever, such as:
- minifying it to remove all whitespace, inline your code, and rename variables to be as short as possible,
- “tree-shaking” to make sure only the parts of your code or dependencies that are actually used are included in the final bundle,
- “code-splitting” your file into chunks which can then be loaded on demand or in parallel and are better for caching.
- Ensuring assets like CSS and images are packaged and loaded in the right order, usually with plugins.
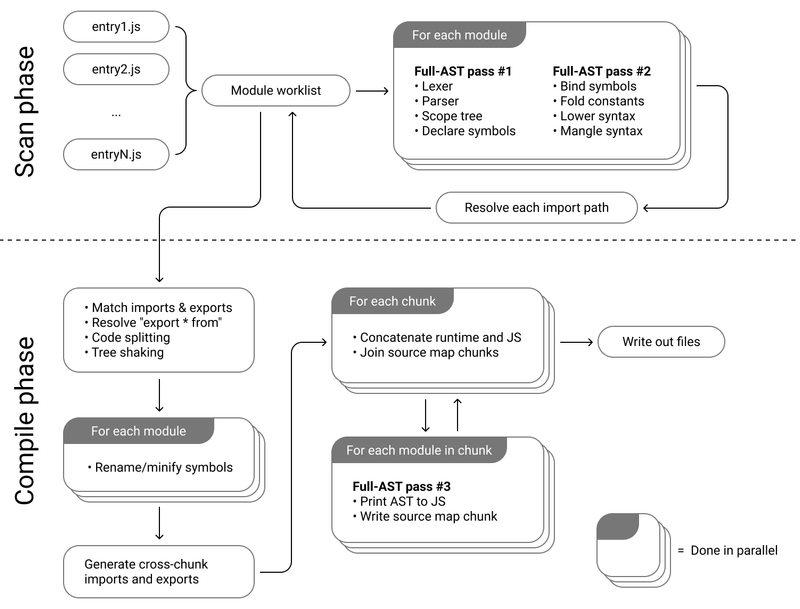
While all bundlers must solve two issues to achieve the above tasks — resolve dependencies and avoid naming conflicts in the final bundle — they have different implementation details. As a general overview, take a look at esbuild’s architecture:
CommonJS vs. JavaScript Modules
It’s mostly necessary to talk about CommonJS vs JavaScript Modules when discussing bundling, because the differences in how dependencies are declared and analyzed in these two module systems have implications for the bundling process. CommonJS was initially introduced in 2009 for server-side applications, in which bundle size is not a big concern. Due to the lack of a standardized module system in the browser back then, it became popular for client-side JS. In 2015, JavaScript Modules was introduced as the standard and it’s been supported by all modern browsers since 2018. Here’s a comparison of their syntax:
// CommonJS
const foo = require('./foo');
module.exports = bar;

// JS Modules
import foo from './foo';
export { bar };
One of the core differences between them is that CommonJS is a dynamic module system, meaning you have to call a function require() at runtime to load dependent modules. Essentially, you’re executing all of the code in the first module, up until you encounter the require statement, before you look for the next module, and so on and so forth. On the other hand, JavaScript Modules is a static module system, meaning the dependency graph is constructed and analyzed before the code is executed. This allows bundlers to perform important optimizations like tree-shaking more effectively.
For a deeper dive into how JavaScript Modules work in the JS engine, check out this excellent article from Mozilla. Here’s an illuminating visual from the article on the three-step process in JavaScript Modules:

A popular example to illustrate the significant benefits of JavaScript Modules is with using lodash. For example, const { maxBy } = require('lodash-es') can be 15x larger than import { maxBy } from 'lodash-es' in the final bundle. This is because the former imports the entire library, while statical analysis in the latter allows the final bundle to get rid of any unused code, resulting in only the maxBy function being imported.
Because all major bundlers now support tree-shaking with JavaScript Modules, it’s not really a differentiator anymore in choosing a bundler. Rather, it’s more important that we use the correct syntax in our source code and optimal configuration in our bundling / compiling tools to ensure tree-shaking is enabled. Take a look at this tutorial from Google for best tree-shaking practices.
Major Bundlers
Webpack, Rollup, and esbuild are three popular bundlers.
Webpack is one of the oldest bundlers. Because it was created during the CommonJS era, its design is heavily shaped by it. The bundling process includes: 1) creating a “module map” to register all module names with their entries, 2) wrapping each module in a function to simulate the module scope, and 3) using a browser-friendly implementation of require, usually called the “runtime”, to glue them together and start the application. Let’s take a look at Webpack’s implementation through an example for the following files:
import b from './b.js';

console.log(b);export default 'Hello World';Here’s the bundle that would have been generated by Webpack (with slight modifications for easier reading):
const modules = {
  'a.js': function(exports, require) {
    const b = require('b.js').default;
    console.log(b);
  },
  'b.js': function(exports, require) {
    exports.default = 'Hello World';
  },
}

webpackStart({
  modules,
  entry: 'a.js'
});

function webpackStart({ modules, entry }) {
  const moduleCache = {};
  const require = moduleName => {
    // if in cache, return the cached version
    if (moduleCache[moduleName]) {
      return moduleCache[moduleName];
    }
    const exports = {};
    // this will prevent infinite "require" loop
    // from circular dependencies
    moduleCache[moduleName] = exports;

    // "require"-ing the module,
    // exported stuff will assigned to "exports"
    modules[moduleName](exports, require);
    return moduleCache[moduleName];
  };

  // start the program
  require(entry);
}
In comparison to Webpack, Rollup’s approach takes advantage of the indigenous design of JavaScript Modules. It “rolls up” all modules into the global scope by dependency order and rename variables / functions, if necessary, to avoid name collision. This gets rid of the need for the runtime and the module map in the bundle, resulting in leaner, simpler code that starts up faster. Let’s take a look at the bundle that would have been generated by Rollup for the same example:
(function (global, factory) {
  typeof exports === 'object' && typeof module !== 'undefined'
    ? factory()
    : typeof define === 'function' && define.amd
      ? define(factory)
      : (factory());
}(this, (function () { 'use strict';

var b = 42;

console.log( b );

})));
This makes Rollup’s final bundle for production more optimal than Webpack’s. However, there’re a number of limitations to Rollup’s approach, the biggest of which being no good solutions for hot module replacement (HMR). HMR is basically and expected feature in modern development workflows that allows developers to update modules while an application is running without a full reload.
The final bundler on the list, esbuild, was first released in early 2020 to make JS bundling 10x-100x faster. Although it hasn’t hit version 1 yet, it’s already used by projects like Vite, Amazon CDK, and Phoenix. According to its own docs, it’s significantly faster than other bundlers that are currently widely used. A twitter search of “esbuild benchmark” show similar results by other users. In my own experience, I’d never experienced a build as fast as esbuild’s that I thought my code was broken when I first used it.
Take a look at esbuild’s explanation about why itself is faster. In summary: 1) it’s written in Go, which is a better language than JavaScript for a CLI tool, 2) the parsing and coding output operations are fully parallel with esbuild, and 3) everything in esbuild is written from scratch with performance as a top priority, and 4) it uses memory efficiently with only three passes over the AST. For more details, check out esbuild’s architecture docs.
How does Vite Fit in?
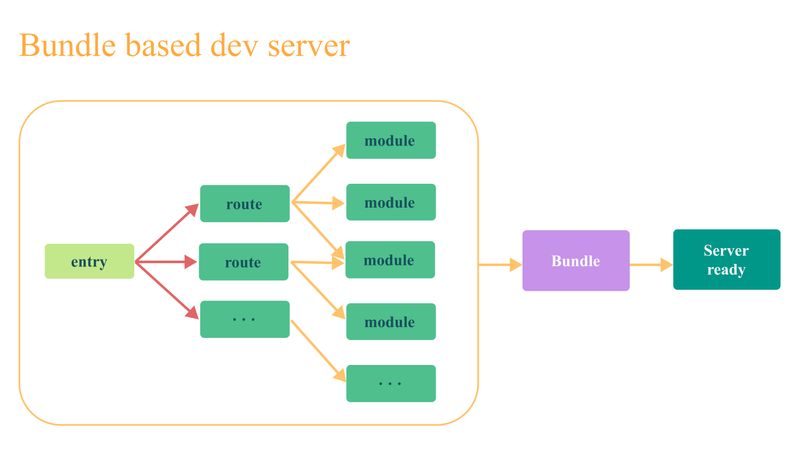
Vite separates the development and production workflows. In development, it uses esbuild to bundle dependencies (often in plain JavaScript and don’t change much during development) and serves source code (usually requires transformation and changes often) over native JavaScript Modules for hot module replacement. This is a clever way to boost developer experience by: 1) taking advantage of dev servers running on your local machine, 2) offloading parts of the bundling process to the browser (assumed to be modern in dev environment), and 3) bypassing re-bundle on every source code change. Here’s a visual comparison between the traditional development workflow (e.g., webpack-dev-server) and Vite’s from the official docs:
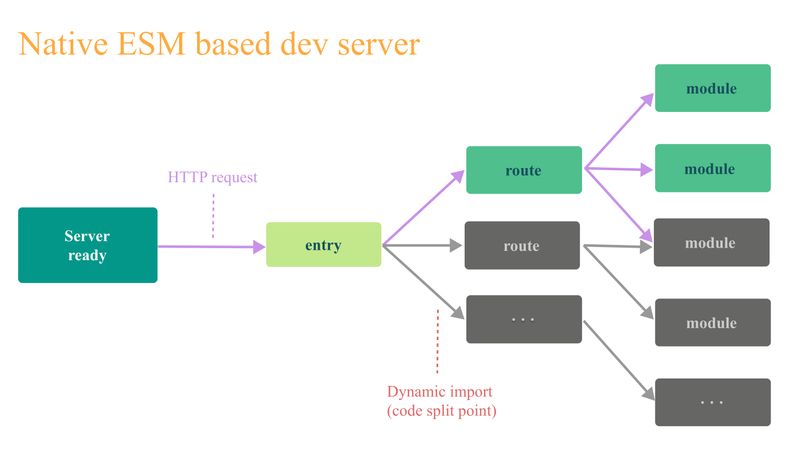
In production, Vite uses Rollup to bundle your code with some pre-configured settings targeting the most common use cases. If you haven’t required highly specific configurations in your build tools, Vite is a great choice for developer experience and optimized production builds.
Compilers
Compilers allow developers to write code in cutting-edge JavaScript and transpile it into old-fashioned JavaScript understood by most browsers. For example, the following code uses optional chaining, which are pretty common in a modern codebase:
const { a } = { a: { b: 42 }};
console.log(a?.b);
After going through a compiler, it would be transformed into the following:
"use strict";

const { a } = { a: { b: 42 } };
console.log(a === null || a === void 0 ? void 0 : a.b);
For a very long time, Babel has been the standard compiler in the ecosystem. However, with the recent uptick in writing JS tools in compile-to-native languages, we’re seeing more tools in the space. Swc is an example that’s written in Rust and is significantly faster than Babel. It takes advantage of a low-level language for better performance and is a drop-in replacement for Babel. It’s already used by Next.js, Parcel, and Deno. Additionally, Vite 4.0 now supports a plugin to use swc in development.