Action Cable is the Rails way to integrate WebSockets, allowing for bi-directional communication with minimal overhead between client and server. I recently made a group chat app with React, Redux Toolkit and Action Cable to support real-time features while leveraging a Rails API to preserve data. The features include:
- Real-time message updates among users in the same chat room.
- Unread message prompts from inactive rooms.
- Display number of unread messages after the user closes browser and logs back in.
Here’s a short demo:
While building this app, I couldn’t find a lot of resources on this subject. The Rails guide lacks clarity for using Rails as API. Tutorials from popular articles do not take advantage of Redux for more integrated state management. This post is my attempt to expand the knowledge base.
This post has three main sections: configuration, send messages (from client) and receive messages (by client). The fundamental concepts for WebSockets/real-time applications are mostly in these sections. However, I think it’s necessary to provide additional guidance on other areas of the application to provide a more complete picture. Additionally, as we encounter Redux Toolkit code snippets in the post, I provide excerpts from its documentation for background as the Toolkit might still be relatively new.
Ok, let’s dive in.
Configuration
Rails Action Cable
Include the redis gem for WebSocket communication; uncomment it in your gemfile and bundle:
# Use Redis adapter to run Action Cable in production 4.0
gem 'redis'
Change the adapter setting in your config/cable.yml to the following:
development:
adapter: redisMount the ‘/cable’ endpoint in your routes to receive connection requests from client.
Rails.application.routes.draw do
  mount ActionCable.server => '/cable'
end
Client side connection request will look like this: CableApp.cable = actionCable.createConsumer('ws://localhost:3000/cable')
Create React App with Redux Toolkit
Create a react app with Redux Toolkit; you can delete any unnecessary starter code.
npx create-react-app chat-app-client --template reduxInstall the actioncable npm package.
npm install --save actioncableEstablish Action Cable Connection
Establish one Action Cable connection in src/index.js and provide this connection to your app through Context.
import React, { createContext } from "react";
import ReactDOM from "react-dom";
import { Provider } from "react-redux";
import actionCable from "actioncable";
import App from "./App";
import store from "./app/store";
const CableApp = {}
// change to whatever port your server uses
CableApp.cable = actionCable.createConsumer("ws://localhost:3000/cable");
export const ActionCableContext = createContext();
ReactDOM.render(
<Provider store={store}>
...
<ActionCableContext.Provider value={CableApp.cable}>
<App />
</ActionCableContext.Provider>
...
</Provider>,
document.getElementById("root");
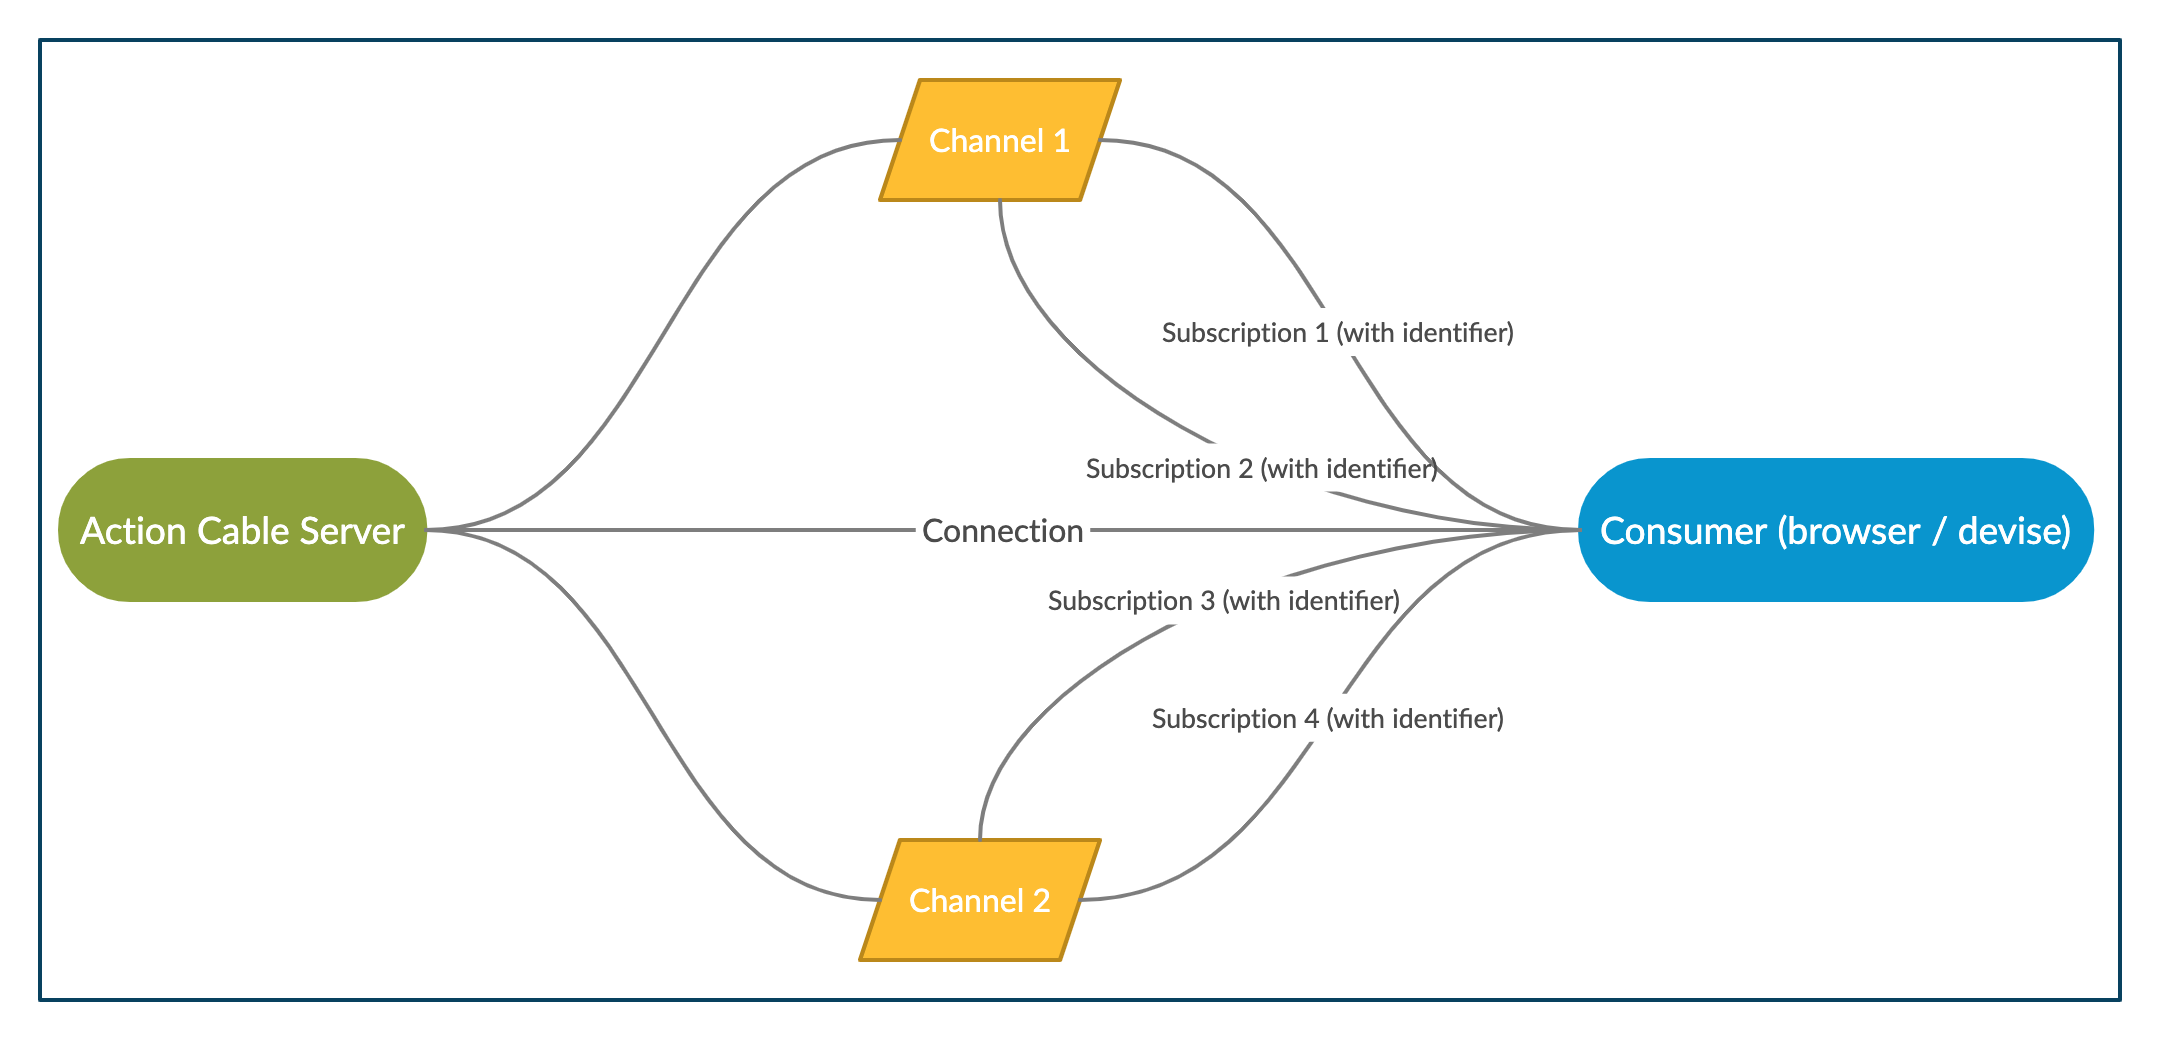
);We create the ActionCableContext here and use it to provide CableApp.cable to App’s component tree. This will allow us to generate subscriptions, through one single connection, to multiple cable channels in the Action Cable server.
Note the url in createConsumer no longer starts with http but ws, denoting WebSocket requests. You might wonder what consumer means here. It’s a term used in Action Cable to refer to the client-side connection to the server. The client-side connection is called a consumer, and the server-side connection is called a connection. The consumer is responsible for creating subscriptions to channels. Refer to Rails guide for the architectural stack explanation. Here’s a much simplified graphical representation:
Data Models and Associations in Rails Backend
Before we go into details on sending messages and receiving messages, we should first generate our models and associations. I include it here just for contextual understanding of data relationships so the names used in later sections don’t create confusion.
Note: The membership table is only necessary for preserving data about unread messages; message can serve as a join table if preserving data is not needed.
  rails g resource user name picture_url
  rails g resource room name description
  rails g resource membership last_read_at:datetime user:references room:references
  rails g resource message content user:references room:references
Send Messages from Client
Create Channel in Rails Backend
Generate the messages channel with Rails command line, which creates the app/channels/messages_channel.rb file for us.
rails g channel messagesSet up the generated channel with subscribed, receive and unsubscribed actions, corresponding to the subscribe, send and unsubscribe functions on the client side.
class MessagesChannel < ApplicationCable::Channel
  def subscribed
    stop_all_streams
    @room = Room.find(params[:id])
    stream_for @room
  end

  def receive(data)
    ...
  end

  def unsubscribed
    stop_all_streams
  end
end
A channel is similar to a controller in a regular MVC setup. It can handle multiple subscriptions with different identifiers. In addition, the difference between stream_from and stream_for is that the former expects a string while the latter an object. For example: stream_from ”chat_#{params[:room]}” vs. stream_for current_user. I find it easier to understand stream_for as it makes the channel more comparable to a controller.
The receive action will be modified in the next section to save messages and broadcast them to client.
Send Messages from React Client
Create a MessagesList component to render the list of messages for the selected chat room. It should have the Action Cable connection provided by ActionCableContext.Provider, which refers to actionCable.createConsumer('ws://localhost:3000/cable').
The MessagesChannel is already created in our Rails backend. As mentioned before, We can create multiple channels on an Action Cable connection; each channel can receive multiple subscriptions from client side. In this example, we create a subscription to the MessagesChannel with the roomId as the identifier. The creation is in a useEffect hook, because we want to trigger the subscription whenever the roomId changes. The roomId identifier will tell our backend which room to stream for.
Additionally, we’re setting the channel as a component state. This is because we need to use the channel to send messages to the backend outside the useEffect hook. We’ll see how to do that in the next step.
Finally, remember to clean up the subscription in the useEffect return function by calling the unsubscribe method provided by Action Cable.
const MessagesList = () => {
  const { roomId } = useParams();
  const cable = useContext(ActionCableContext);
  const [channel, setChannel] = useState(null);

  ...

  useEffect(() => {
    const channel = cable.subscriptions.create({
      channel: 'MessagesChannel',
      id: roomId,
    });

    setChannel(channel);

    return () => {
      channel.unsubscribe();
    }
  }, [roomId]);

  ...

};
Now we’ve created the subscription, we can use its send method to send data to our backend. The corresponding action in our backend is receive(data).
const sendMessage = (content) => {
  const data = { roomId, userId, content }
  channel.send(data)
}
This function is called by an input component where the user input their messages and that’s where it gets the content. Additionally, our backend expects roomId and userId. We can use the useParam hook to get the roomId from the url pretty easily if we follow REST conventions. For the userId, we can dispatch an action to add user id to the Redux store when user logs in. This way, we can use a useSelector hook to get current user’s id:
const currentUserId = useSelector(state => state.users.currentUser);Receive Messages in Client
Action Cable Broadcasts Data
The backend work for this part is extremely easy as we have already set up our MessagesChannel and associated actions. We only need to build out our receive(data) action so it saves the received messages in our database and broadcasts it back to client.
class MessagesChannel < ApplicationCable::Channel
  ...
  def receive(data)
    user = User.find_by(id: data['userId'])
    message = @room.messages.create(content: data['content'], user: user)
    MessagesChannel.broadcast_to(@room, MessageSerializer.new(message).serialized_json)
  end
  ...
endNote: Remember we have already identified the correct @room in our subscribed action. So we can directly use it in our receive action.
The MessageSerializer is a class that we create to format the data for broadcasting. I used FastJsonApi to construct it:
class MessageSerializer
  include FastJsonapi::ObjectSerializer
  attributes :content, :created_at
  belongs_to :room
  belongs_to :user
end
You can also perform the broadcast later with an Active Job instance, so the data transmission is queued up for better performance. It can be done like this:
class MessagesChannel < ApplicationCable::Channel
  ...
  def receive(data)
    ...
    MessageRelayJob.perform_later(message)
  end
  ...
end
And the job:
class MessageRelayJob < ApplicationJob
  queue_as :default

  def perform(message)
    room = message.room
    MessagesChannel.broadcast_to(room, MessageSerializer.new(message).serialized_json)
  end
end
React Client Receives Messages
We first need to identify where in our client we want to receive messages. As detailed in the previous section, we’re sending messages from the MessagesList component, which is mounted on the user’s active chat room. As users can only send messages from the active chat room, this makes total sense. However, because we want users to see unread message prompts from inactive chat rooms, we need to receive messages in ChatRoomsList, which is mounted on the user’s chat rooms dashboard but not selected in the url. We can created a child component called ChatRoomsListItem to handle the specific functions.
import { messageReceived } from '../messages/messagesSlice'

...

const ChatRoomsListItem = ({ room }) => {
  const dispatch = useDispatch();
  const cable = useContext(ActionCableContext);

  ...

  useEffect(() => {
    cable.subscriptions.create(
      { channel: 'MessagesChannel', id: room.id },
      {
        received: (data) => {
          dispatch(messageReceived(data))
        },
      }
    )
  }, [room, dispatch]);

  ...

  return (
    ...
    <Link to={`/rooms/${room.id}`}>
      {room.name}
    </Link>
  )
}
Like before, we get the Action Cable connection from the ActionCableContext, and establish subscriptions to the MessagesChannel for each of the chat rooms on the dashboard. We don’t need to set a component channel state here because there’s no need to use the subscription outside the useEffect hook. It just receives data and dispatches an action to update our Redux store.
The messageReceived function is from our Redux messagesSlice. It handles an addOne action to add the received message to the store:
import { createSlice, createEntityAdapter } from '@reduxjs/toolkit';

...

const messagesAdapter = createEntityAdapter();

const initialState = messagesAdapter.getInitialState({
  ...
});

...

const messagesSlice = createSlice({
  name: 'messages',
  initialState,
  reducers: {
    messageReceived(state, action) {
      const data = action.payload.data;

      const message = {
        id: data.id,
        ...data.attributes,
        roomId: data.relationships.room.data.id,
        userId: data.relationships.user.data.id,
      };

      messagesAdapter.addOne(state, message);
    },
  },
  extraReducers: {

   ...

  },
});

export const { messageReceived } = messagesSlice.actions;
If you are not familiar with Redux Toolkit, here’s an explanation of createSlice:
It takes care of generating action type strings, action creator functions, and action objects. All you have to do is define a name for this slice, write an object that has some reducer functions in it, and it generates the corresponding action code automatically. The string from the
nameoption is used as the first part of each action type, and the key name of each reducer function is used as the second part.
In our example, the messages name + the messageReceived reducer function generated an action type of {type: "messages/messageReceived"}.
In addition, here’s an explanation of createEntityAdapter:
It provides a standardized way to store your data in a slice by taking a collection of items and putting them into the shape of
{ ids: [], entities: {} }. Along with this predefined state shape, it generates a set of reducer functions and selectors that know how to work with that data.
The entity adapter, in our case messagesAdapter, provides a set of generated reducer functions for adding, updating, and removing entity instances from the entity state. In our messageReceived reducer, we’re using the addOne reducer function which accepts a single entity and adds it. We’re taking advantage of Redux’s serialization for better performance.
React Client Displays Messages
Now with the newly received message properly stored in our Redux store, we need to display it to our user. There are two scenarios:
-
If the message belongs to an active room, then we should render it in the
MessagesListcomponent. Remember, this component is rendered with the ‘rooms/:roomId’ url and displays the message log for the room as well as an input component. -
If the message belongs to an inactive room, then we just need to show an indicator on the
ChatRoomsListItemcomponent to let the user know that they’ve received messages in this inactive room. In this example, I’m bolding the chat room’s name and updating the number of unread messages in a badge.
Active Room
We first should create a selector in the messagesSlice to select messages by roomId from our Redux store.
...

export const { selectAll: selectAllMessages } = messagesAdapter.getSelectors(
  (state) => state.messages
);

export const selectMessagesByRoom = createSelector(
  [selectAllMessages, (state, roomId) => roomId],
  (messages, roomId) => messages.filter((message) => message.roomId === roomId)
);
Again, if you’re not familiar with Redux Toolkit, here’s an explanation of getSelectors:
The adapter object also has a
getSelectorsfunction. You can pass in a selector that returns this particular slice of state from the Redux root state, and it will generate selectors likeselectAllandselectById.
The createSelector function is re-exported from the Reselect library:
It takes one or more ‘input selector’ functions as argument, plus an ‘output selector’ function.
When we call selectMessagesByRoom(state, roomId), createSelector will pass all of the arguments into each of our input selectors. Whatever those input selectors return becomes the arguments for the output selector.
In our case, we have two input selector functions:
selectAlMessages
(state, roomId) => roomId
Because we pass in (state, roomId) to the selectMessagesByRoom selector, createSelector will pass them into both of the input selector functions. The result of the first input selector function is messages and the second is roomId. Together they become the arguments of the output selector, which is used to filter the messages.
Now we can use this selector to render new messages that are added to our store to the MessagesList component:
...
import { selectMessagesByRoom } from './messagesSlice'
import { useSelector } from 'react-redux'
import MessageItem from './MessageItem'

const MessagesList = () => {

  ...

  const messages = useSelector((state) => selectMessagesByRoom(state, roomId));

  const renderedMessages =
    messages &&
    messages.map((message) => (
      <MessageItem key={message.id} message={message} />
    ));

  ...

}
Once a component is hooked up to our store, most of the state management logic will live in the Redux slices. The result is that we have a clean component which automatically re-renders when the selected state changes.
Inactive Room
Like before, we need to create a selector to select unread messages by roomId. The difference is that we need to filter out messages that are older than the lastReadAt timestamp. The room entity includes a last_read_at attribute, providing information about when the user looked at this room most recently. It can be null if the user joined the room but has not looked at it. So we can select the unread messages by comparing the message’s created_at attribute with the room’s last_read_at attribute. In the output selector, we use several helper functions from date-fns to help us with the comparison
...
import { selectRoomById } from '../rooms/roomsSlice';
import { isAfter, parseISO, subYears } from 'date-fns';

export const selectUnreadMessages = createSelector(
  [selectMessagesByRoom, selectRoomById],
  (messages, room) => {
    const lastReadAt = parseISO(room.lastReadAt) || subYears(Date.now(), 1);

    return messages.filter((message) =>
      isAfter(parseISO(message.created_at), lastReadAt)
    );
  }
);This is all the setup for unread messages. Now we can use the selector in the ChatRoomsListItem component to render the unread messages indicator.
...
import { selectUnreadMessages } from '../messages/messagesSlice'

const ChatRoomsListItem = ({ room }) => {

  ...

  const numOfUnreads = useSelector((state) =>
    selectUnreadMessages(state, room.id)
  ).length;

  const getFontWeight = () => {
    if (location.pathname.slice(7) === room.id) {
      return 'fontWeightRegular';
    }

    return numOfUnreads === 0 ? 'fontWeightRegular' : 'fontWeightBold';
  }

  const renderedNumOfUnreads = () => {
    if (location.pathname.slice(7) === room.id) {
      return 0;
    }

    return numOfUnreads;
  }

  ...

  return (
    // material UI
    <Link to={`/rooms/${room.id}`}>
      <Badge badgeContent={renderedNumOfUnreads()}>
        <Typography>
            <Box fontWeight={getFontWeight()}>{room.name}</Box>
          </Typography>
      </Badge>
    </Link>
  );
};Note: We don’t want the unread prompt to show up on the active room. So we created some helper functions to figure out if prompts are necessary based on the url.
Conclusion
The mental shift from HTTP to WebSockets is a big one. But once you get the hang of it, it’s not that bad. Understanding this concept will provide a solid foundation for building real-time applications. So I’d say it’s worth the effort.